Phoenix Computer Repair and Business IT Support | Expert Solutions You Can Trust


Computer Repair Experts in Phoenix, Arizona. my PC Techs Presents:

Tech Tips - Business IT Support Tips


RSS feed for my PC Techs news  RSS Feeds: Entries (RSS) and Comments (RSS)

Pages

Tech Tip Archives
Log in

Which Do You Use Most Often for Work?

View Results

Loading ... Loading ...

Posts Tagged ‘files’

Microsoft’s SyncToy Keeps Data Safe and Handy

Monday, April 30th, 2012

Do you have a need to frequently access folders and files on a laptop or other computer that is not turned on 24/7? If this is you, you’ll know that you usually have to turn on the laptop and wait for it to boot to a state that allows you to access the data. This could be as quick as two minutes or as long as 10 minutes, depending on the age of your hardware. Even worse, if your battery is low and no ac power is available to plug in the laptop you may have to wait even longer.

You don’t have to wait anymore, there is a solution to your data accessibility problems! You can copy those folders and files to a usb memory stick and, not only will you be able to access to the data from another computer, you will also have a “live” backup just in case something ever happens. On a small memory stick with a small amount of data it is possible to perform the data copy operations and keep the data synchronized manually. As your data grows however, the process will eventually become difficult to manage in an effective way. Just the need to answer “Yes” or “No” to every overwrite dialog could make a regular copy operation turn into a nightmare.

Fortunately, Microsoft provides a free tools called SyncToy which will help minimize the time it takes to keep files in sync between folder pairs on your laptop and thumb drive. Download SyncToy here: http://www.microsoft.com/en-us/download/details.aspx?id=15155

You will need the proper download based on your existing operating system, your choices are x64 or x32 bit versions. To find out what version you need, click Start, right click on the computer icon, and select Properties. Half way down the page you’ll see the “System” Header, now find “System Type” and look to see if your system requires 32-bit or 64-bit software. Download and install SyncToy then run it, which will bring up the following screen:

SyncToy's opening screen

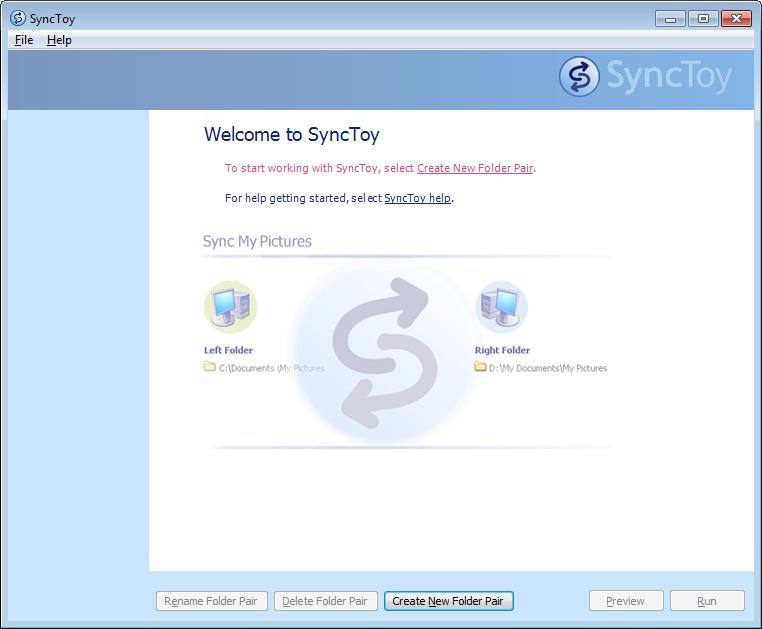
To begin, you need to create a folder pair. This pair is how SyncToy manages keeping your files syncronized between the left and right folders. When you click on the Create Folder Pair button you start the process of joining the folder pairs. It is easiest if you browse to the location for each pair:

Starting a folder pair

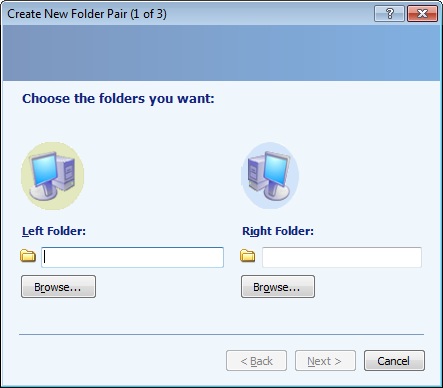
For this example we will use a “Test” folder with the “left” folder on the local hard drive and the “right” folder on a thumb drive. If a folder does not exist on the right folder destination, SyncToy allows you to create the folder as needed. Once you have folders set, you will be given a choice to Synchronize, Echo, or Contribute. For most applications you should Synchronize. You should carfully consider each option to get the best result. Here are the definitions of the options.

Synchronize: New and updated files are copied both ways. Renames and deletes on either side are repeated on the other.

Echo: New and updated files are copied left to right. Renames and deletes on the left are repeated on the right.

Contribute: New and updated files are copied left to right. Renames on the left are repeated on the right. No deletions.
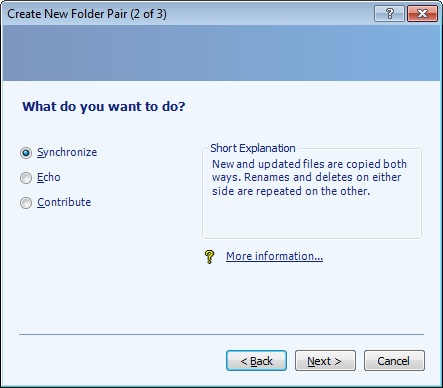
Choose your Sync

Now name your pair. This should be a simple name, yet descriptive of the pair.
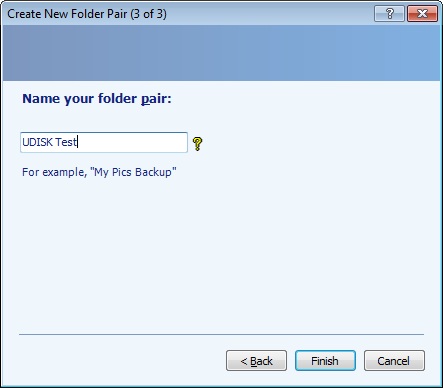
Name your pair

That is all there is to creating folder pairs:

The First Pair

The simpler you keep your pairs, the easier it will be to maintain them. Now you simply need to run the pair(s) as needed, or put them on a schedule, but that is a topic for a future blog post.

my PC Techs provides expert computer consultants to your Arizona business. Let us help your business save money and increase productivity. Call today (602) 456-0150 for a free consultation.

Using CleanMgr to Reduce File Clutter

Wednesday, February 15th, 2012
There have been countless articles written to help you with reducing temporary files that clutter your hard drive. Windows performs cleanup for most of these files under normal circumstances, but control over the process is limited. To gain more control over these files, you can use CleanMgr as part of a normal monthly maintenance cycle.

In a modern Windows OS, when you click Start/Accessories/System Tools/Disk Cleanup you will note a dialog which will eventually present you with choices of files to remove from your computer. These are left over files from various activities and will look something like this:

Disk Cleanup can assist you in removing no longer needed files

Now you are able to select the categories you want to remove, for example, Temporary Internet Files, Microsoft Error Reporting Temporary Files, Recycle Bin, Temporary Files, WebClient/Publisher Temporary Files, etc. Note these are all temporary files. There are also other categories you should normally never select. These include Office Setup Files, Log Files, Compress Old Files and Catalog files for the Content Indexer. Please note Windows Vista and Windows 7 users will have more options available.

If this is the first time you have ran CleanMgr (Disk Cleanup), the initial scan process could take quite some time. These scan’s may take in excess of an hour. Microsoft had provided a way to streamline this process through preferences, but you have to use the Command Prompt to take advantage of it.


To get started we’ll need to use the CMD prompt. Alternatly, you can “Run” a command from the “Start Button” this will work too.

Let’s start with the CMD prompt:

For Windows XP click Start/Run/CMD

For Windows 7 click Start/All Programs/Accessories/Command Prompt

This will open a Command Console allowing you to type in the following command:

cleanmgr.exe /sageset:99

Running CleanMgr from the Command Prompt

This will bring up a new Disk Cleanup Settings window

Using the Sageset switch

On Windows XP computers, you should usually select the following categories: Temporary Setup Files, Downloaded Program FIles, Temporary Internet Files, Microsoft Error Reporting Temporary Files, Old Chkdsk files, Recycle Bin, Temporary Remote Desktop files, Temporary Files, WebClient/Publisher Temporary Files, Catalog files for the Content Indexer. Optionally you could select Debug Dump Files and Offline Webpages as well. You should almost NEVER select Office Setup Files.

On Windows 7 computers, you should usually select the following categories: Temporary Setup Files, Downloaded Program Files, Temporary Internet Files, Debug Dump Files, Old Chkdsk files, Recycle Bin, Service Pack Backup Files, System error memory dump files, System error minidump files, Temporary Files, Temporary Windows installation files, Thumbnails, Files discarded by Windows upgrade, Per user archived Windows Error Reporting Files, System archived Windows Error Reporting Files

Once you have made your selections, Click OK.

Now that you have saved your settings, run the following command:

cleanmgr.exe /sagerun:99

The Sagerun Switch

This process could take some time to complete and will run on all attached drives. So if you have network drives or external drives you do not want included, be sure to disconnect or remove these drives.

For more information about using CleanMgr from the command line please reference:

http://support.microsoft.com/default.aspx?scid=kb;en-us;Q315246 (for Windows XP)

http://windows.microsoft.com/en-us/windows7/Delete-files-using-Disk-Cleanup (For Windows 7)

my PC Techs provides expert computer repair and computer consulting services to the Phoenix metro area. For more information or to schedule an appointment please call (602) 456-0150.


WE WORK HARD FOR YOU, BUT DON'T JUST TAKE OUR WORD FOR IT!
We've helped over 1,000 satisfied businesses throughout the Phoenix valley, click here to view some of their testimonials:

computer tech support near mePhoenix Computer Repair Testimonials on Google My Business My PC Techsmy PC Techs on TwitterFacebook Page for my PC TechsTech Support by United States Citizens Based in Arizona
Home | Computer Repair Phoenix | Managed IT | Web Development | Testimonials | Contact | Privacy | Pay | Blog RSS feed for my PC Techs news | Site Map

Phoenix Arizona: 125 N. 2nd Street, Suite 533 Phoenix, Arizona 85004
Phone: (602) 456-0150 | Email: admin@mypctechs.com
©2010 my PC Techs is owned and operated by Leo Polus, L.L.C., concept by Andre Morris
 

Managed IT and Computer Repair services for these Arizona cities: Ahwatukee, Carefree, Cave Creek, Chandler, Chandler Heights, Fountain Hills, Gilbert, Glendale, Higley, Laveen, Mesa, Paradise Valley, Peoria, Phoenix, Scottsdale, Tempe

To learn how Managed IT and Computer Repair services can help your Phoenix area business save money and increase productivity, click here to visit Phoenix Computer Repairs.

my PC Techs | Expert IT and Computer Repair Solutions You Can Trust | (602) 456-0150