Hopefully this post can help you solve an issue if you’re experiencing a situation with no audio while connecting to a Windows 10 VM in Hyper-V, but audio is not passing through via RDP.
A client had a Hyper-V deployment on Server 2012 R2, hosting a Windows 7 Virtual Machine. They were using Remote Desktop via a Windows 10 client computer to connect to the Windows 7 VM. Within the RDP shortcut on the Windows 10 machine, they had several options checked under ‘local resources’, ‘configure remote audio settings’:
Remote audio playback, play on this computer was checked
Remote audio recording, record on this computer was checked
In addition, within the same RDP shortcut file were the following applied settings (edited with notepad):
audiocapturemode:i:1
audiomode:i:0
audioqualitymode:i:2
From within the Hyper-V host, the VM had ‘allow enhanced session mode’ and ‘use enhanced session mode’ applied for both user and server.
Under these settings and while connecting to the Windows 7 Virtual Machine, audio pass-through via RDP was functional. The Windows 10 machine was able to RDP into the W7 VM and play audio files within the VM that would pass through to the local machine’s speakers.
The problem arose after performing a Windows Update that updated the Windows 7 VM to a Windows 10 VM. The update went smoothly and all application data and user data was preserved during the update process. The client was using the same RDP connection settings to connect to the new Windows 10 VM as described above. However, no audio was passed through the VM to the local machine. In fact, there was a red X shown on the speaker icon from within the VM in the taskbar, and upon hovering over the red X the message displayed was “No audio device” and “Code 45”.
Several troubleshooting steps were attempted, including all the following:
Verify on the local windows 10 machine that the following services were running and set to automatic startup: Windows Audio, Remote Desktop Services, Remote Desktop UserMode Port Redirector
Verify that all of the same services were running on the Hyper-V host server
Look for the ‘Remote Audio’ device from device manager on the Server 2012 R2 Hyper-V host system, which existed.
Attempt to uninstall, then re-install the ‘Remote Audio’ device on the Windows 10 VM, which failed.
Verify that all updates were applied to both the Hyper-V server and the Windows 10 Virtual Machine, which had no impact on the issue
On the server, looked at the Group Policy settings under Computer Configuration, Administrative Templates, Windows Components, Remote Desktop Session Host, Device and Resource Redirection and verified that “Limit audio playback quality” was set to “Enabled” and “Audio Quality” was set to “High”
SFC and DISM scans were ran within the Windows 10 VM to verify that no OS files were corrupt
The most unusual aspect of this issue was the fact that, when connecting to the Windows 10 Virtual Machine using the Hyper-V Manager, and using ‘Enhanced Session’, the remote audio played on the VM would work just fine and would transfer through for playback on the local machine. Since audio redirection worked just fine when connecting via the Hyper-V Manager, but not RDP, I was certain that it was a setting pertaining to the RDP that connection that was the source of the problem.
After some additional reading, we first thought that the VM was faulty, as it was initially setup as Generation 1 for Windows 7, whereas most recommend using Generation 2 for Windows 10. However, after several days of tweaking settings and testing, we finally found the true source of the issue.
The fix was found in the group policy “Enable Remote Desktop Protocol 8.0”. This setting was set to “Enabled” under the Windows 7 VM for whatever reason. After the update to Windows 10, the setting remained, and caused the audio redirection to fail. Changing this setting from “Enabled” to “Not Configured” followed by a reboot allowed audio redirection to work again. Finally, audio could be passed from the Windows 10 VM to the local Windows 10 machine for playback.
How frustrating is it to be at your computer, just trying to get your work done, when all of a sudden you’re attacked by intrusive pop-ups? Sure, you might learn about the next big deal on hair removal products, but these distracting windows can prevent you from getting the job done.
If you are getting annoying little popups while you work there’s a good chance your computer has a virus or malware. This intrusive and often dangerous software should be removed by a computer expert. Like the ones at my PC Techs.
We provide Expert Technology Solutions You Can Trust.
You don’t have to know much about computers, all you need is our number. We can help!
Call my PC Techs at 602.456.0150 and get your work done faster.
There have been countless articles written to help you with reducing temporary files that clutter your hard drive. Windows performs cleanup for most of these files under normal circumstances, but control over the process is limited. To gain more control over these files, you can use CleanMgr as part of a normal monthly maintenance cycle.
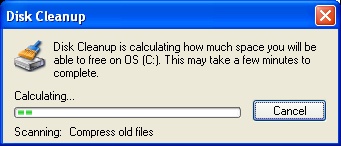
In a modern Windows OS, when you click Start/Accessories/System Tools/Disk Cleanup you will note a dialog which will eventually present you with choices of files to remove from your computer. These are left over files from various activities and will look something like this:
Disk Cleanup can assist you in removing no longer needed files
Now you are able to select the categories you want to remove, for example, Temporary Internet Files, Microsoft Error Reporting Temporary Files, Recycle Bin, Temporary Files, WebClient/Publisher Temporary Files, etc. Note these are all temporary files. There are also other categories you should normally never select. These include Office Setup Files, Log Files, Compress Old Files and Catalog files for the Content Indexer. Please note Windows Vista and Windows 7 users will have more options available.
If this is the first time you have ran CleanMgr (Disk Cleanup), the initial scan process could take quite some time. These scan’s may take in excess of an hour. Microsoft had provided a way to streamline this process through preferences, but you have to use the Command Prompt to take advantage of it.
To get started we’ll need to use the CMD prompt. Alternatly, you can “Run” a command from the “Start Button” this will work too.
Let’s start with the CMD prompt:
For Windows XP click Start/Run/CMD
For Windows 7 click Start/All Programs/Accessories/Command Prompt
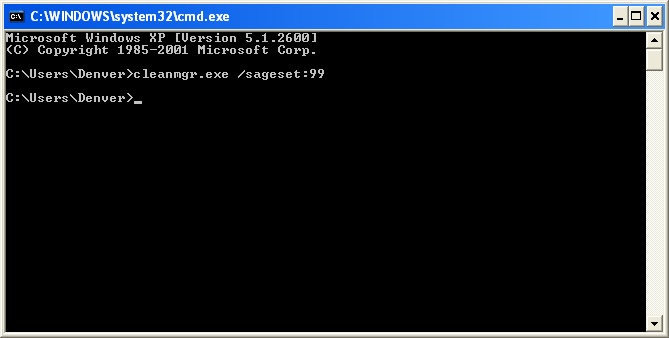
This will open a Command Console allowing you to type in the following command:
cleanmgr.exe /sageset:99
Running CleanMgr from the Command Prompt
This will bring up a new Disk Cleanup Settings window
Using the Sageset switch
On Windows XP computers, you should usually select the following categories: Temporary Setup Files, Downloaded Program FIles, Temporary Internet Files, Microsoft Error Reporting Temporary Files, Old Chkdsk files, Recycle Bin, Temporary Remote Desktop files, Temporary Files, WebClient/Publisher Temporary Files, Catalog files for the Content Indexer. Optionally you could select Debug Dump Files and Offline Webpages as well. You should almost NEVER select Office Setup Files.
On Windows 7 computers, you should usually select the following categories: Temporary Setup Files, Downloaded Program Files, Temporary Internet Files, Debug Dump Files, Old Chkdsk files, Recycle Bin, Service Pack Backup Files, System error memory dump files, System error minidump files, Temporary Files, Temporary Windows installation files, Thumbnails, Files discarded by Windows upgrade, Per user archived Windows Error Reporting Files, System archived Windows Error Reporting Files
Once you have made your selections, Click OK.
Now that you have saved your settings, run the following command:
cleanmgr.exe /sagerun:99
The Sagerun Switch
This process could take some time to complete and will run on all attached drives. So if you have network drives or external drives you do not want included, be sure to disconnect or remove these drives.
For more information about using CleanMgr from the command line please reference:
my PC Techs provides expert computer repair and computer consulting services to the Phoenix metro area. For more information or to schedule an appointment please call (602) 456-0150.
We do work for several restaurants and retail stores here in Phoenix, Arizona. These shops are all using windows based point of sale systems. While the software and database that run on the computers to transact credit card payments and process menu items are highly customized and supported by the franchise in most cases, the underlying operating system and hardware is not.
We have learned a lot about these systems and can say with certainty that the biggest issues we have run into are lack of proper backups and lack of spare hardware. When a point of sale system goes down for a store, especially a busy store, it is NO FUN. Employees need to process payments manually by hand and write out paper receipts. As you can imagine, the slowdown at the register does a lot to aggravate customers and employees alike. But there are three things that you can do as a retail store business owner to minimize downtime in the event of a system crash.
1. Perform regular system maintenance
Hiring a firm like my PC Techs to regularly maintain your equipment each month can save you from several hours worth of headache and hundreds or thousands of dollars in lost sales. Our technicians will visit your store and examine your systems for irregular performance. System errors, faulty hardware, failing hard drives, botched OS updates, and corrupted data can, in many cases, be identified and corrected before it becomes a larger problem. Dust can be cleaned out (the largest cause of hardware failure), and parts inspected. Unnecessary programs can be removed and system performance improved. The best part of this scenario, the repairs can be performed before or after regular hours, so customers never experience delay.
2. Perform regular, complete data backups
Usually during the same time as the system maintenance, our technicians can perform a complete data backup of all of your POS systems. This is important. When a hard drive crashes, you want to get your system back online as quickly as possible. To rebuild an entire system, restore data from on off site repository, and get all the hardware and software working correctly could take many hours. With a complete system backup, it could be as simple as popping in the right piece of replacement hardware and running a 30 minute recovery.
3. Identify and build an inventory of replacement parts
When a system failure happens, recovery time can be improved considerably when the right spare parts are kept on hand. Rather than buying hard to find computer equipment online, and waiting for it to be shipped, a replacement part can be obtained from storage and quickly installed to replace the broken component. That part can later be replaced to storage, so you always have a backup on hand for the next time disaster strikes.
When you think about the security of your data and your ability to transact business, keep in mind your local computer experts and ways that they can work with you to help improve the reliability of your computer operations. For help with the maintenance and emergency support of your POS systems, contact my PC Techs today. (602) 456-0150.
WE WORK HARD FOR YOU, BUT DON'T JUST TAKE OUR WORD FOR IT! We've helped over 1,000 satisfied businesses throughout the Phoenix valley, click here to view some of their testimonials:
Managed IT and Computer Repair services for these Arizona cities: Ahwatukee, Carefree, Cave Creek, Chandler, Chandler Heights, Fountain Hills, Gilbert, Glendale, Higley, Laveen, Mesa, Paradise Valley, Peoria, Phoenix, Scottsdale, Tempe
To learn how Managed IT and Computer Repair services can help your Phoenix area business save money and increase productivity, click here to visit Phoenix Computer Repairs.
my PC Techs | Expert IT and Computer Repair Solutions You Can Trust | (602) 456-0150
 456-0150")


 We do work for several restaurants and retail stores here in Phoenix, Arizona. These shops are all using windows based point of sale systems. While the software and database that run on the computers to transact credit card payments and process menu items are highly customized and supported by the franchise in most cases, the underlying operating system and hardware is not.